Chamberlain garage door opener reset procedure is needed when your garage door opener is not working but getting the electric power properly. Moreover, if you lost your remote control or you want to change it, you need to reset your Chamberlain garage door opener to make it functional again.
Chamberlain Garage Door Opener Reset Procedure
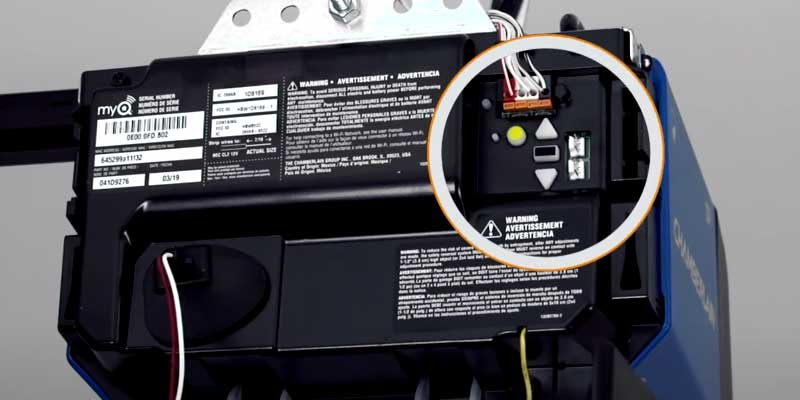
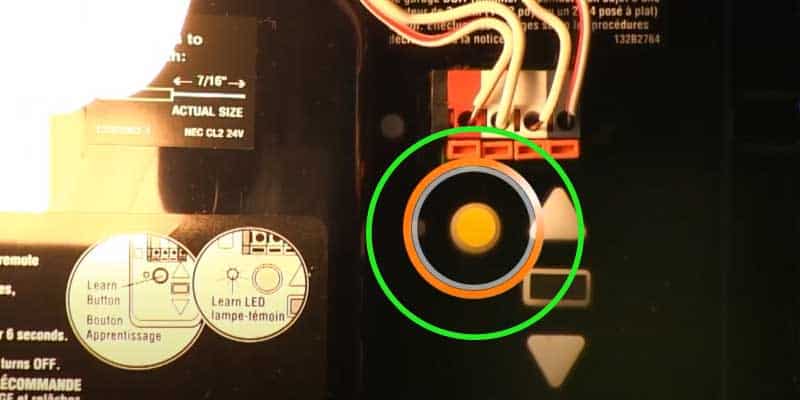
In general, for conducting the reset procedure of your chamberlain garage door opener you need to find out the ‘LEARN’ button first. Now press and hold the learn button for at least 6 seconds and then release the ‘LEARN’ button when the LED light is getting ‘OFF’.
If the procedure is not working do the same thing which the author has mentioned again within 30 seconds.

Factory Reset Procedure of a Wi-Fi Chamberlain Garage Door Opener
To remove the Chamberlain garage door opener from the myQ account, the user needs to conduct a Wi-Fi factory reset. This is applicable when the user wants to change the account.
To conduct a Wi-Fi factory reset procedure follow the below-listed steps:
- Find the yellow color garage door opener ‘LEARN’ button first on your Wi-Fi garage door opener.
- Press and hold the ‘LEARN’ button for at least 6-8 seconds and release it when the ‘LEARN’ LED light goes out.
- Do the same things as per step no-02 for a total of three times.
- After that, you will hear 3 quick beeps from your Wi-Fi garage door opener.
- The factory reset procedure of your Wi-Fi garage door opener has been done.
Resetting Chamberlain Garage Door Opener with DIP System
For an old model Chamberlain garage door opener, the reset needs to be conducted by DIP switches. In general, an old version Chamberlain garage door opener has 9-12 DIP switches with remote control. These switches are present at both the garage door opener and remote control.
The DIP switches can be in an ‘On or Off’ position. The resetting procedure is listed below;
- First, remove the cover of the door control of the control panel to get access to DIP switches.
- Set the door control DIP switches as per your requirements.
- After that, follow the pattern of the door control in your handheld remote control.
- Keep both patterns the same as always.
- The system has been reset.
Reset of Chamberlain Garage Door Keypad Without Enter Button
- Firstly, open the cover of your garage door opener remote control.
- Now, press and hold the * and # button together for a while until the red LED flashes at least 2 times.
- After the flashing of this red LED light, the password will be reset.
- Again set a 4-digit new password for next time use and keep remember or write it on a paper. After that press the # button and press 1-9 button also as per the type of your garage door opener.
- Now, press the # button again.
- After that search a ladder to press the LEARN button of your garage door opener.
- Now, go to the location of your garage door keypad before the LED light stops flashing.
- After that, press the new password key and three times the 0 button together.
- The keypad reset procedure has been conducted.
Reset of Chamberlain Garage Door Opener by Control Panel
To reset your Chamberlain garage door opener by the control panel follow the below-mentioned steps carefully:
- Find the LEARN button on your garage door opener control panel.
- Now, press and keep hold for a while and you will see that the LED light will turn off as you are conducting the reset procedure.
- After that, you will see that a bulb which is situated inside the opening unit starts flashing.
- This flashing is the indication of a successful reset procedure.
- Now, try to open the garage door opener by using the control panel keypad or remote control.
- If the garage door is not opening, you can be sure that the reset has been done.
- To set the program again you need to connect the remote control and keypad with the door opener.
How to Reset Keyless Remote
Resetting a keyless remote control is also a very easy one. Just follow the below-listed steps to conduct this reset procedure:
Keyless Remote Reset by LEARN Button:
- Find the garage door opener’s LEARN button and release the button immediately.
- Now, you will see the indicator’s LED light will be On for 30 seconds.
- At that moment, press the down button and LEARN button of your remote control.
- After that, look at the motor unit’s lightbulb. If it is blinking, release the buttons of your remote control.
- Some garage door motor units have a clicking sound instead of a light.
- The resetting procedure has been done.
Keyless Remote Reset by Malfunctioned Door Control:
- Firstly, press and hold any button on your remote control for 3-6 seconds.
- Now, press and hold the problematic door control’s ‘light button’ and remote control’s ‘enter’ button together at the same time.
- At the same time press the door control’s ‘push bar with the above-mentioned two buttons.
- Release all the three pressed buttons when you will see the ‘lightbulb’ of the door control motor flashing.
- If your door control has no lightbulb, you will hear 2 clicks sound.
- Resetting your garage door remote control has been done.
Keyless Entry Keypad Passcode
How to Erase Remote Control from the Chamberlain Garage Door Opener’s Memory?
In two ways you can do it. The ways are:
- Erase the remote control’s memory by using the garage door opener’s LEARN button
- Erase the remote control’s memory by using the myQ control panel’s LEARN button
The details of these two ways are written below.
Erase Remote Control’s Memory by Using the Garage Door Opener’s LEARN Button
- Find the LEARN button first.
- Now, press and hold the LEARN button for a while
- Release the LEARN button when the LED light turns ‘OFF’.
- The remote control’s memory has been erased.
Erase Remote Control’s Memory by Using the myQ Control Panel’s LEARN Button
- Find the myQ LEARN button on the control panel first.
- Now, press and hold the LEARN button for a while
- Release the LEARN button when the LED light turns ‘OFF’.
- The remote control’s memory has been erased.
Safety Precautionary Before and at the Time of Reset Procedure
To conduct a reset at your Chamberlain garage door opener, you need to maintain some safety precautions. In this way, you can avoid accidental damage to your garage door and the persons beside you. Please follow the below-listed instruction to maintain safety precautionary;
- Keep the entry of your garage obstacle-free. Any kind of materials should not be stored in front of the garage door.
- Before programming your Chamberlain garage door, you must check the model number first. Operating instruction may vary depending on the model number.
- Periodic inspection needs to be conducted by a professional person. Although, the user also can do this periodical inspection if he has enough knowledge regarding the garage door.
- At the time of garage door operation or problem fixing, the user should clear the people or animals from there. Accidental issues may happen due to this unconsciousness.
Conclusion
This is all about the Chamberlain garage door opener reset procedure. The data has been collected from the user’s manual of Chamberlain garage doors, the user’s experience, and the expertise of Chamberlain garage doors. The author hopes that this article will help the user to solve their resetting problem in the Chamberlain garage door opener. Happy reading.
